Item Information Widgets
Available beginning in version 17.04.008
A widget can be created, and used on the sales order, purchase order, and job line forms. The widgets in these cases is already populate with data beneficial for business intelligence insights. The feature is referred to as "hero title".
The feature works by making basic changes to Form Layouts via System > Maintenance
Process
Setting Up the Widget
- Navigate to System > Maintenance > Form Layouts
- Create (or modify if existing) one of the Form Layouts below.
- newpo2 - Edit Purchase Order Line
- neword2 - Edit Sales Order Line
- newjob2 - Edit Job Part
- In the tree view on the right, expand the edit line frame depending on what Form Layout was selected above.
- Next, in the tree view on the right, expand the first SectionFrame, then select it. This SectionFrame will have different links depending on what Form Layout was selected in step 2 above.
- Click Add New.
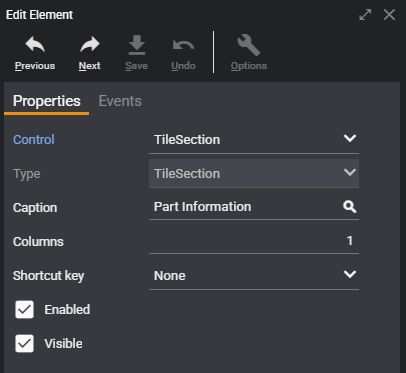
- In the Edit Element dialog, set the following:
- Control: TileSection
- Caption: Part Information
- Leave the rest as the default (make sure Columns is set to 1).
- The screen should like similar to the one below
- Save and close this dialog.
- Verify that a new section link for “Part Information” appears in the top form section.Click on the “Part Information” section link to reveal its contents (empty for the moment).
- In the tree view, select “Part Information (TileSection)”.
- Click Add New.
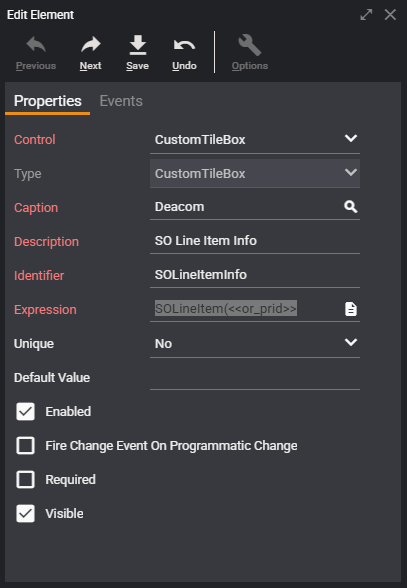
- In the Edit Element dialog, set the following:
- Control: CustomTileBox
- Caption: Deacom (does not get used - can be anything).
- Description: SO Line Item Info (or whatever you like. If using PO or Job Lines, enter appropriate description)
- Identifier: SOLineItemInfo (or whatever you like. If using PO or Job Lines, enter appropriate Identifier based on description)
- Expression: Depends on what Form Layout is being created or modified.
- For SO Line Item, using the Identifier in this example enter this in the Expression field 'SOLineItem(<<or_prid>>)' - If using PO Line Item an example would be 'POLineItem(<<pu_prod>>)' See the Expression Requirements & Information section below for additional details on what may be used in the Expression field.
- Leave the rest as the default.
- The screen should like similar to the one below
- Click Save and close the dialog
- On the Form Layout verify that t the Part Information section now has a placeholder tile with the given description inside.
- The screen should look similar to the one below.

- Save the Form Layout
Viewing the Widget in the system
Example: Sales Order Entry
- Navigate to Sales > Order Entry
- Select any Bill-To Company.
- Click Add (+) above the Lines grid.
- Verify that there is now a Part Information section link/tab in the top section. (if you click the Part Information section there will be nothing displayed since a part has not been selected yet.)
- Select a Part Number in the Part Number field.
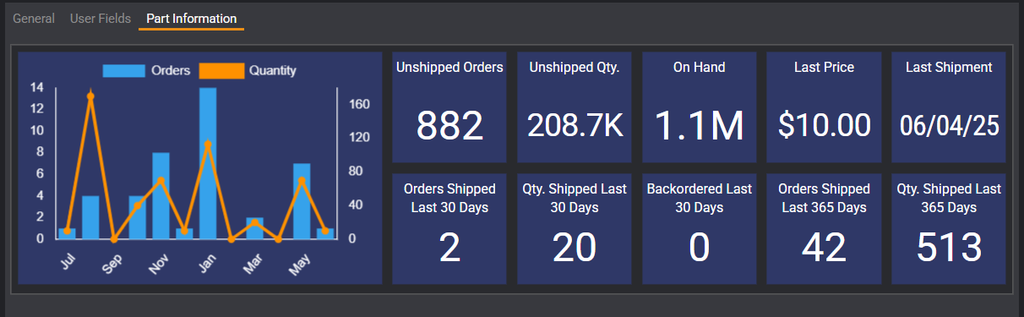
- Click the Part Information section link and verify that information is now populated in the various windows (or badges) in the Part Information section.
- An example of a populated section is show below.
-
Expression Requirements & Information
The following parameters are available to the Expression field on the Edit Element form depending on which For Layout is being modified:
- newpo2 - Edit Purchase Order Line
- Widget Call: POLineItem(<<pu_prid>, <<tp_waid>>>, <<tp_veid>>)
- First parameter is required, others are optional.
- neword2 - Edit Sales Order Line
- Widget Call: SOLineItem(<<or_prid>>, <<to_waid>>, <<to_biid>>, <<to_shid>>)
- First parameter is required, others are optional.
- For unused optional parameters, either use 0 or leave out entirely.
- newjob2 - Edit Job Part
- Widget Call: JobLineItem(<<lj_prid>>, <<jo_waid>>)
- First parameter is required, others are optional.
Additional Notes
- Users may wise to use the font-resizer (indicated by the triple ddd symbol on the top right of the Deacom page) to improve their visibility and use of the widgets features.
- Large numbers will be abbreviated with "K" for thousands and rounded to one decimal place, with tooltips available for full values.
- Badges are draggable, allowing users to rearrange them as needed. When a user hovers over an information window (or badge) the cursor changes to a hand when over a badge, indicating that the badge can be dragged.